
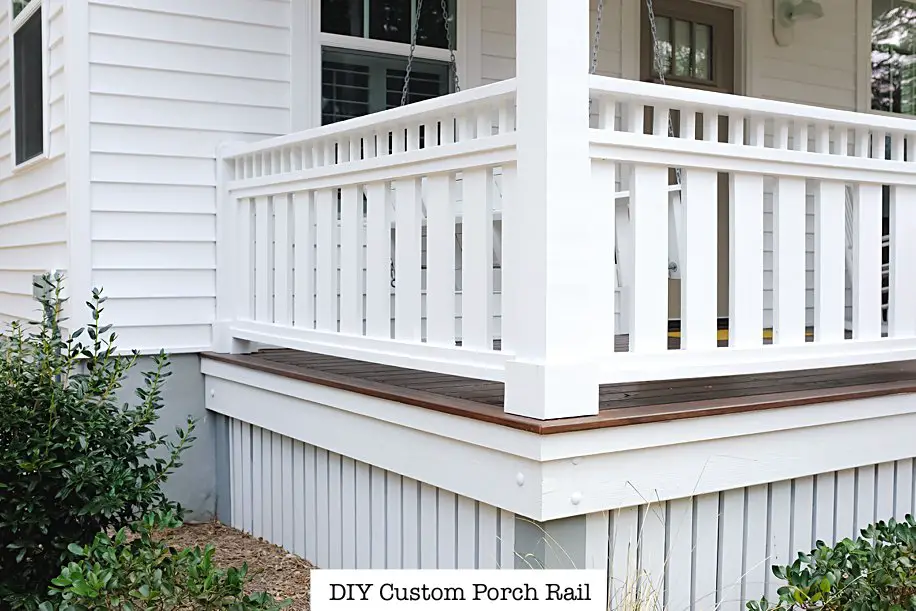
Let’s talk about your Custom Porch Deck Rail with our Cottage Design!
Are you tired of the boring pre-made porch and deck railings?
Sharing our design with you is our pleasure! Adding a DIY Custom Porch Deck Rail to your home or cottage will provide you with a one of a kind custom feel!
DIY Custom Porch Deck Rail Cottage Design
SUPPLIES NEEDED:
-2″x4″x8′ pressure treated lumber
-2″x6″x8′ pressure treated lumber
-5/4″ pressure treated decking boards (we prefer to remove the rounded edge through a table saw to provide a squared off edge)
-2″x2″x8″ pressure treated lumber for decorative top piece
-1″x2″x8′ pressure treated trim boards
–Wood Glue
–Wood Filler
–brad nails 1 & 5/8″ Stainless Steel
-15 Gauge 2 & 1/2″ Stainless Steel Finish Nails (it’s important to use stainless nails to prevent rust)
-Trim Screws #9×3″ exterior trim head coated wood screws
-Wood Paint Primer (we like Zinserr 1-2-3 Primer)
-High Quality Exterior Paint
TOOLS NEEDED:
-Miter Saw (we like this Kobalt Saw)
-Sander (we like this Porter-Cable Sander)
-Finish Nailer Ryobi Nail Finisher
GREAT, LET’S GET STARTED ON YOUR CUSTOM PORCH DECK RAIL COTTAGE DESIGN!
-PREP & DRY
Throughout our life we love saving money, this project was no different.
First of all we purchased low quality wood that in return would require us to prep and dry prior to project. This saved us about half the cost of higher quality wood.
Prep and Drying includes prepping and filling knot holes and cracks, as well as letting the wood dry out by stacking with spacers to create air flow.
(please note, low quality wood does not need to be purchased and time can be saved by purchasing pre-dried better quality wood)
Deck, Porch and Porch Posts Should be Fully Completed prior to Railing Project. You will be attaching the railings to your porch/deck/posts.
-DESIGN
We designed a template to refer to during the project.
In addition we have kindly included this template of our design to guide you through your project.
-ASSEMBLY
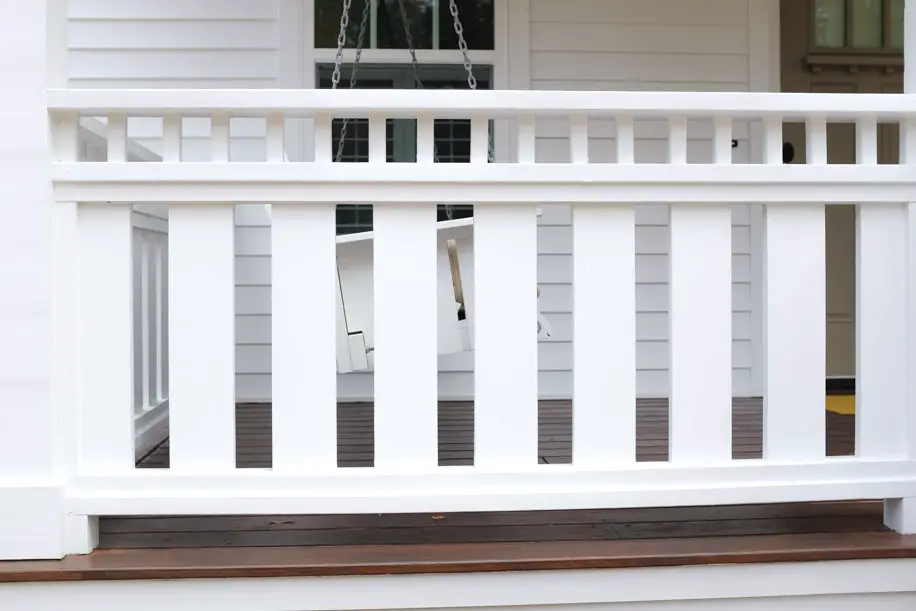
DECORATIVE CENTER RAIL:
Cut a 2″x4″ to proper length to fit between your posts. This is the center horizontal board on the template.
Nail the decorative 2″x2″x4″ pickets in the center using scrap pieces of wood to create a jig. This jig spacer will be used to place pickets evenly while nailing.
BOTTOM RAIL:
Starting with the bottom 2″x4″ attach one of the 1″x2″ pieces standing vertical to allow the 5/4″ boards to be centered in the 2″x4″
Cut this assembly to length to fit in between your posts.
Cut 2 2″x4″s at 3 1/2″ long blocks. These will be nailed to the inside bottom of the posts.
The next step will be nailing the bottom rail to the blocks.
VERTICAL PICKETS:
From there the 5/4″ boards are now cut to 24″. Using spacers to keep equal distance
between them, attach the bottom of the 5/4″ boards to the 1″x4″ with 1 5/8″ brad nails.
CENTER RAIL ATTACHMENT:
For the center 2″x4″ with the decorative 2″x2″‘s facing up is fastened in the same way as the bottom only on top of the 5/4″ boards.

TOP RAIL ATTACHMENT:
The post size will determine the size of your top rail. The top rail size can be either a 2″x4″ or a 2″x6″.
If your porch or deck has 4″x4′” posts you will be using a 2″x4″ therefore if you have 6″x6″ posts, you will be using a 2″x6″ board.
The top rail will be attached with one finishing nail into each decorative 2″x2″ picket. From there you will use a trim screw to secure the top rail to each of your posts.
Wood joints were caulked then all wood was primed and painted.
Enjoy your new railing and furthermore prop your feet up and go grow a sweet Lemon Tree!
LET US KNOW IF YOU HAVE ANY QUESTIONS, OR COMMENTS!
WE WOULD LOVE TO SEE YOUR FINISHED RAIL! DID YOU MAKE ANY CHANGES?
LEAVE US A COMMENT BELOW
Thank you for enjoying my Blog!
I sure do appreciate it and would love to hear from you in the comments!
Peace, Love, and Simple Living Friends!
~Erin

In Response to Mark’s Great Question/Comment Below.
Here is a Picture of our Rail Design that we continued on down the Steps. We added a 2×3 on top to bring the height up which created a hand rail. This was also required where we live due to code.
“Hello Erin,
Thank you for sharing this deck rail design. I have entry steps that lead up to my front porch. Do you have steps entering your deck and if so, what did you do for handrailing down the steps? Would love to see photos if available.
Thanks, Mark”


What size are the “deck boards”?
Hi Kendra,
The boards are 5/4″ boards.
Hope this helps! Feel free to ask any other questions…we are happy to help.
Peace, Love & Simplicity, Erin
We are replacing the deck on our lake house . We have searched the internet for 2 weeks for a unique porch/deck rail treatment. Of all we’ve seen, we like yours best. Excellent design and execution. We plan to have the deck built by a pro and cut, assemble, paint and install the rails ourselves. I have two questions. We particularly like the finish of the porch boards in the finished photo. How did you achieve that look? Second question – From the photos, you finished all the carpentry on the porch first and then painted the rails and stained or painted the porch afterwards. I don’t see any white paint on the porch boards or stain/paint from the porch boards on the rails. How did you achieve that? Again, excellent design and execution. You should be proud.
Thank you so much Larry for enjoying our design!
We love it because it’s very unique and we agree the white against the dark porch looks amazing!
I’ll also say the stain is holding up really well after going on three years now. We have some wear on the steps…but other than that it hasn’t peeled or chipped as other stains have done to us in the past.
We’d be happy to walk you through how we did it…
-Let the wood dry since it’s treated wood, some will need time to dry out.
-First Step is to Prime the Railing with a really good primer, we use This PRIMER for everything…it keeps all stains from coming through.
-For the Railing we used Sherwin Williams “Emerald” which is one of their better paints. Color is White Exterior Paint applied with a brush.
We were just really careful painting and any paint that was splattered we sanded off in the next step.
-Next we lightly Sanded the Deck/Porch boards.
-Next We applied the Stain on the Deck/Porch Boards.
What we used is This BEAUTIFUL Stain
We fell in LOVE with this stain as soon as we saw it because it resembles our Hardwood flooring “inside” our cottage, therefore it “feels” as if we are walking seamlessly throughout our front porch, inside our cottage, and we also used it on our screened porch.
One tip is to make SURE to use a Good Quality Brush like This Wooster One
-Once the first coat of stain is dry you will need to lightly sand again, then apply the final light coat.
And there you have it!
Hope this helps…feel free to comment back if you need any additional help, we are happy to share our design and help with you for your lake house!
~Erin and Corey
Thanks Erin for the quick reply. Do you remember if you used the Sherwin Williams Emerald Exterior Acrylic Latex or their Emerald Urethane Trim Enamel? It’s o.k. if you don’t remember. When we buy it, we can ask the people at the store what they recommend. Also, I appreciate the links to the primer, stain, and brush. We’re big Amazon users so that was very helpful. Thanks again.
You are most welcome Larry! We are happy to help.
Yep, we are looking at our touch up can as I write this. It’s Acrylic Latex.
Would LOVE to see a pic of your finished product when you all are finished!
O.K. Will send along some photos when we’re done. Thanks again for the help.
My wife showed me your railing. We are getting ready to replace ours after taking the old railing out. The design looks very nice and easy to put together.
Hi Randy, so glad your wife found our design!
Let us know if you need any advice, happy to help…hope you enjoy adding it to your home!
It was really insightful.
Thanks for such a nice content.
Cheers
BTW if anyone interested more have a look https://sawfinder.com thanks
It’s a simple design but looks gorgeous. I read the whole article, it’s easy to make. I want to replace my old rail. This article will help me to make a new one perfectly. Thank you for describing the complete work process.
Thank you Jhon for enjoying our blog!
We are glad you enjoyed our rail design and hope you enjoy making it
~Erin :-)
Hi Erin
I see Kendra asked about what size are your deckboards. You replied 5/4. I think what she meant was how wide are they? Are they 6” width, which is really like 5 3/8- 5 1/2… but you said you remove the rounded edge too? So what width are they after you ripped them down?
I really love the look of this railing design. I’ve been looking for something like this for months.
~Jodie
Hi Jodie,
Sorry it has taken us a little while to respond. As far as the lumber used just a simple 5/4″ deck board that I trimmed each rounded edge as to not have it look like a deck board. So once that was done the total width ended up being 5″ wide with square edges. Thank you again for the compliments.
I like how you frugally approached this project. This inspires me and my wife to do the same thing. We will need an expert from Trex decking to help us out on the knot holes and cracks in case we find it troublesome while trying it out on our own.
Remodeling our wrap around porch now!! And we are going with the same 5/4 rails. Curious…what color stain did you use on the porch itself?
Hi Danielle,
Super Exciting you are Remodeling your wrap around porch!
Sure thing, I’d be more than happy to share the color of our stain.
It’s Cabot Gold The Ultimate Finish Moonlit Mahogany. (Polished Protection for Decks and Outdoor Furniture)
It’s available at Amazon at This Link, and also available at Lowes.
We LOVE it. It’s held up so nicely and flows from our hardwood floor inside that’s almost the same color.
Hope that helps! Best of luck with your porch and thank you for enjoying our blog.
~Erin
We absolutely love this design and have started building it. One question, how did you attach the top portion, the small pieces sandwiches between the 2×4 & 2×6, the the bottom portion?
Hi Hannah,
Absolutely, we would be happy to help!
The 2×4 and the 2×6 and the 2×2 spindles we built prior to building the full railing.
We built that part by using a template we created that provided the proper spacing for each spindle.
(The template we just made it out of a 2×4 and 2×2 spindles kind of like a jig)
Then this upper part was put together with wood glue and finishing nails.
Once the lower part of the railing was finished and installed, the upper part was set in place on top of it.
We used trim screws to attach it to the posts.
Hopefully that makes sense? Let us know if you have any other questions…we are happy to help!
Thank you for enjoying our blog!
~Erin
Hi There! Love this plan, currently finished building and installing it on our front porch! Going just finishing on wood filler and then I’ll paint it.
Curious how you did your porch/deck skirt?
Thanks!
Hi Zach,
So exciting that you are already at the porch/deck skirt!!
I bet it looks beautiful! Sure thing, we’d be happy to share how we did the bottom porch skirt.
It is 2×2 as our framing against the foundation of our cottage, under the porch and also put the 2×2 on the ground as well.
Almost like a frame. We stapled aluminum insect screening to prevent critters from getting under the porch.
We used the 2×2 framing to attached 1x4s keeping 3/4 inch spacing between each one.
You could also add a door, depending on how high your porch/deck is, which would provide nice access to underneath.
Hope this helps! So happy you’ve enjoyed our design and blog, thanks a bunch!
Erin :-)
Thank you so much for such an informative piece of information :)
If anyone interested similar one’s have a look here
Besttoolsbrand
Thanks
I absolutely love your design and have been looking for something classically simply like this for my little cottage!
What lumber size did you use to trim the bottom of your columns?
Thank you so much Kate, that’s very sweet. So happy to hear our design is simply perfect for your little cottage!
To answer your question: For the trim on the bottom of the columns we used 1×4 and mitered the corners.
Hope this helps! Thanks a bunch for enjoying the blog and I’d love to see your finished cottage rail!
Could you provide a sectional view of the railing? I’m having trouble understanding the bottom rail configuration.
Hi Sam,
The 5/4 board is sandwiched by two 1″x 3/4″ board.
That is what holds it in place on a 2×4″ board.
Hope this helps?
Thanks a bunch for enjoying my blog and for your comment!
Hello Erin,
Thank you for sharing this deck rail design. I have entry steps that lead up to my front porch. Do you have steps entering your deck and if so, what did you do for handrailing down the steps? Would love to see photos if available.
Thanks, Mark
Hi Mark,
Thanks a bunch for enjoying the design and blog!
I’ve updated the blog with a picture of our steps/rail.
Hope that helps!
Thanks a bunch, Erin
Thank you for sharing your process! I’m updating my front porch and getting a vinyl railing installed in the spring, but I’ve been trying to decide on a railing design for the project. I love the decorative center panel you used on yours- I think that would look great on my porch!
Thanks a bunch Ella!
I’m so happy to hear you enjoy the decorative center portion of our railing.
Thanks for enjoying my blog
~Erin
WONDERFUL PROJECT
I plan to add on the porch of our newly built farmhouse
In the instructions, you wrote “″ attach one of the 1″x2″ pieces standing vertical to allow the 5/4″ boards to be centered in the 2″x4″. Since the 1×4 is only 3/4” inch thick its not esy to nail it to the 2×4 without being off-center (worse if you are using trim screws). What do you recommend ?
Thanks a bunch for enjoying the blog and our porch railing.
We used a scrap piece of 5/4 board, centered on the 2×4 and then placed the 1by on each side of the 5/4 board.
Used a finish nailer and wood glue to attach the 1bys standing up.
Hope this helps!