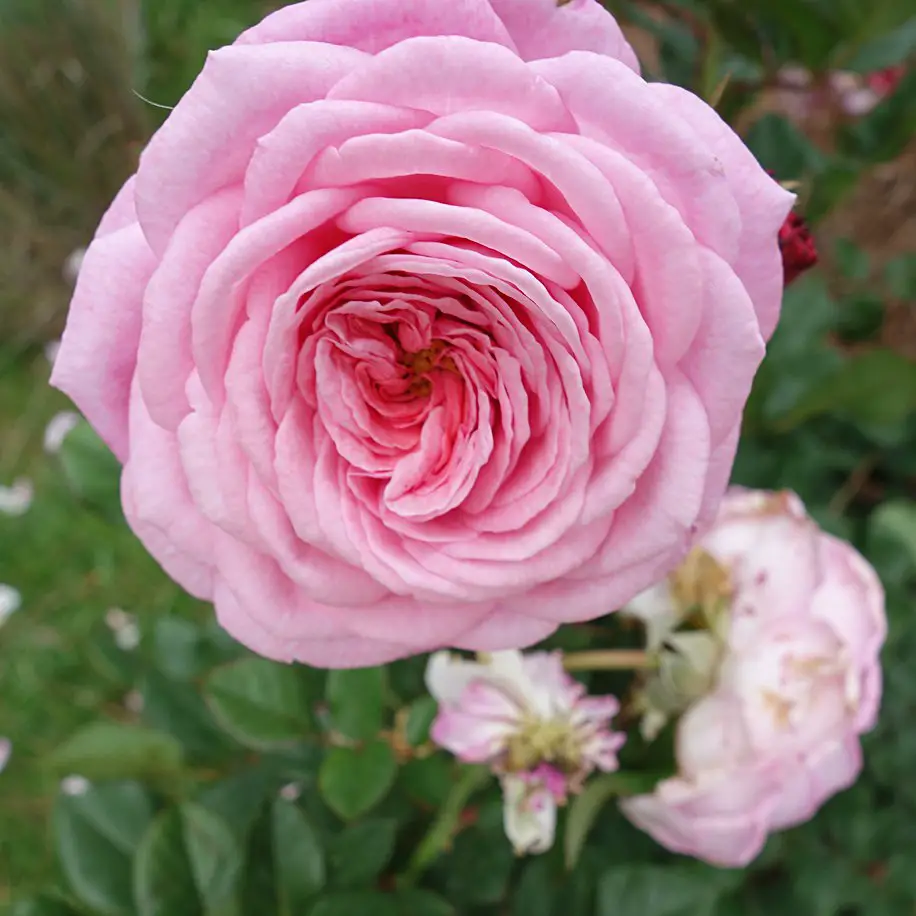
Spaghetti Squash; Small Wonder Winter Squash, How to Harvest, Bake, Cook & Eat; grow your own food
You may be wondering How to Harvest, Bake, Cook & Eat Spaghetti Squash the Small Wonder Winter Squash? I'm gonna help you grow your own food in the garden! Why eat pasta, when you can eat your winter squash just like you would spaghetti? photography by: Erin S. of Simply Living NC What is a Small Wonder Spaghetti Squash? A Small Wonder Spaghetti Squash is a super cute small personalized version of the known larger Spaghetti Squash. It's a Winter Squash which means it stores perfectly for up to six months!NUTRIENTS IN SPAGHETTI SQUASH:VITAMIN A: good for your vision, boosts your immunityVITAMIN C: boosts your immunity, wound healing, helps with absorption of ironVITAMIN B6: reduces depression, may help with weight loss, boosts brain preformanceCALCIUM: good for bonesIRON: boosts your immunity, restores sleep, improves concentration HOW TO grow & HARVEST WINTER SQUASH: I PREFER TO GROW MY SMALL WONDER SPAGHETTI SQUASH AS A CLIMBING VINEit takes up less space and the plants produce really well. I USE THESE MESH PRODUCE BAGS TO HELP SUPPORT THE SQUASH AFTER THEY DEVELOP These bags mentioned are truly a garden's saving grace, I use them for all of my heavy fruits, veggies, and they are perfect to use after harvest as well, or sharing with friends! I ADORE THESE BAGS. SMALL WONDERS TYPICALLY TAKE ABOUT 90 DAYS TO MATURE YOU WILL NOTICE THE STEM GETTING A BIT DRIER THE FRUIT WILL BE SHINY, CHECK THE HARDNESS...WHICH SIMPLY MEANS LEAVING AN IMPRESSION WITH YOUR FINGER NAIL WILL BE DIFFICULT YOU MAY STORE THE WINTER SQUASH IN A DARK COOL LOCATION UP TO 6 MONTHShowever, I ate mine quite quickly because they are so darn tasty! photography by: Erin S. of Simply Living NC HOW TO prepare, cook and bake spaghetti squash: WASH THOROUGHLY CUT IN HALF LENGTH WISE (be very careful, as they are quite hard) PREHEAT YOUR OVEN AT 375 TO 400 DEGREES (depending on your oven) SCOOP OUT ALL OF THE SEEDS AND GUSHY STUFF DRIZZLE THE INSIDE WITH OLIVE OIL & SALT LIGHTLY PLACE FACE DOWN ON BAKING SHEET OR I PREFER THIS BAKING DISH BAKE FOR 30-45 MINUTES (depending on the size of your squash) USE A FORK TO SCRAPE OUT THE SQUASH STRINGS RESEMBLING SPAGHETTI THE FOLLOWING PART IS OPTIONAL *I like to add parmesan and slices of tomatoes and place it bake in the oven for a few momentssprinkle with a little parsley and garnish with fresh (TO SEE AND PRINT FULL RECIPE, CONTINUE BELOW ) photography by: Erin S. of Simply Living NC photography by: Erin S. of Simply Living NC photography by: Erin S. of Simply Living NC photography by: Erin S. of Simply Living NC photography by: Erin S. of Simply Living NC photography by: Erin S. of Simply Living NC photography by: Erin S. of Simply Living NC photography by: Erin S. of Simply Living NC photography by: Erin S. of Simply Living NC So there ya have it friends...cute personalized spaghetti squash of which
Get Rid of Mosquitoes Safely & Treat Bug Bites
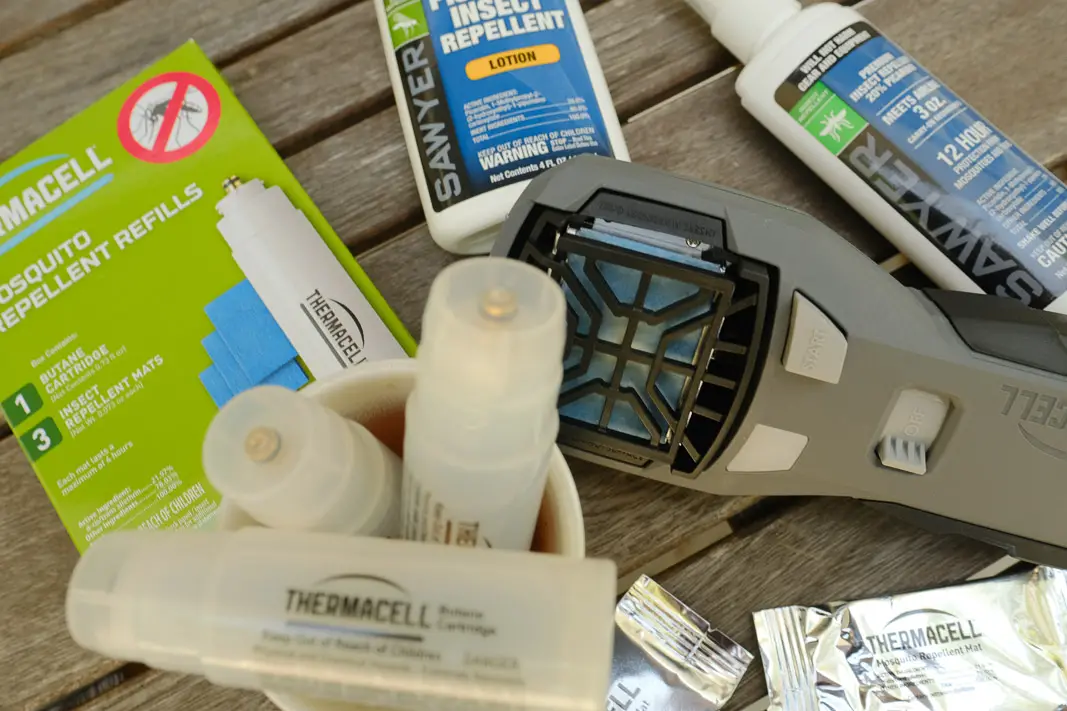
Does sweet Summertime leave you wondering how to Get Rid of Mosquitoes Safely & Treat Bug Bites?If so, then this is the perfect blog for you. We have finally after many years figured out the best treatment with 3 Easy Steps with bonus of how to treat mosquito bites and other bug bites. I don't know about you, but when I'm strolling throughout my garden for a morning harvest or an evening watch the sun go down session, I don't want to be eaten alive by the dreaded mosquitoes! There's nothing worse than hearing that buzzzzzz in your ear and then bam, next thing ya know you have an itchy red swelling bump upon your skin. What is a Mosquito?Mosquitoes are a member of the fly family called Culicidae which can also mean gnat.Their life cycle includes eggs, larva, pupa, and the dreaded adult stage in which the nasty bites come from. The Adult mosquito lays it's eggs on water surfaces such as old kiddie pools, ponds, bird baths, old tires, and even flower pots. These blood feasting flyers have mouthparts that allow them to pierce their victims skin and feed on their blood. Sound gross right? Well, let's face it...it indeed is gross! Why does a Mosquito Bite Swell & Itch?The saliva from the mosquito can cause a very itchy rash and raised bump. Not only can this be extremely uncomfortable, it can be quite dangerous! Mosquitoes carry a variety of diseases that can be injected with one little bite. Diseases such as West Nile, Yellow Fever, Malaria, Zika and more. Yuck!Bites from these blood sucking nasty ones can cause discomfort, sickness, and in some cases even death How to Get Rid of Mosquitoes Safely & Treat Bug Bites? THREE EASY STEPS, AND FOUR INEXPENSIVE PRODUCTS HAVE WORKED WONDERS FOR US! ONE:Number one is to GET RID of the Mosquitoes!First eliminate any standing water such as kiddie pools, gutters, flower pots, tires, etc.Next is to Sprinkle these little magic bits upon the ground wherever water puddles during rain storms, and where you may have moist areas. Next, and this point is so very cool! Pour some of the bits in a disposable plastic cup, screw onto a fence and/or place wherever needed and fill with a little water. The mosquitoes will go into the water mixture to lay their eggs, however they will be unable to hatch.Leaving you with the first step to Mosquitoes being gone! You can purchase the Mosquito Bits at this Link photography by: Erin S. of Simply Living NC photography by: Erin S. of Simply Living NC TWO:Step two is to repel the Mosquitoes.As previously mentioned in my other fragrance free blogs, I am so allergic to any type of scent...therefore it's extremely difficult for me to find bug repellents, sprays, and units that indeed are odorless Well my friends, I have FINALLY found Odorless Mosquito Repellents that Work! photography by: Erin S. of Simply Living NC My first FAVE on my Repellent list
How to Make Refrigerator Pickles 2 Ways; dill plus bread & butter
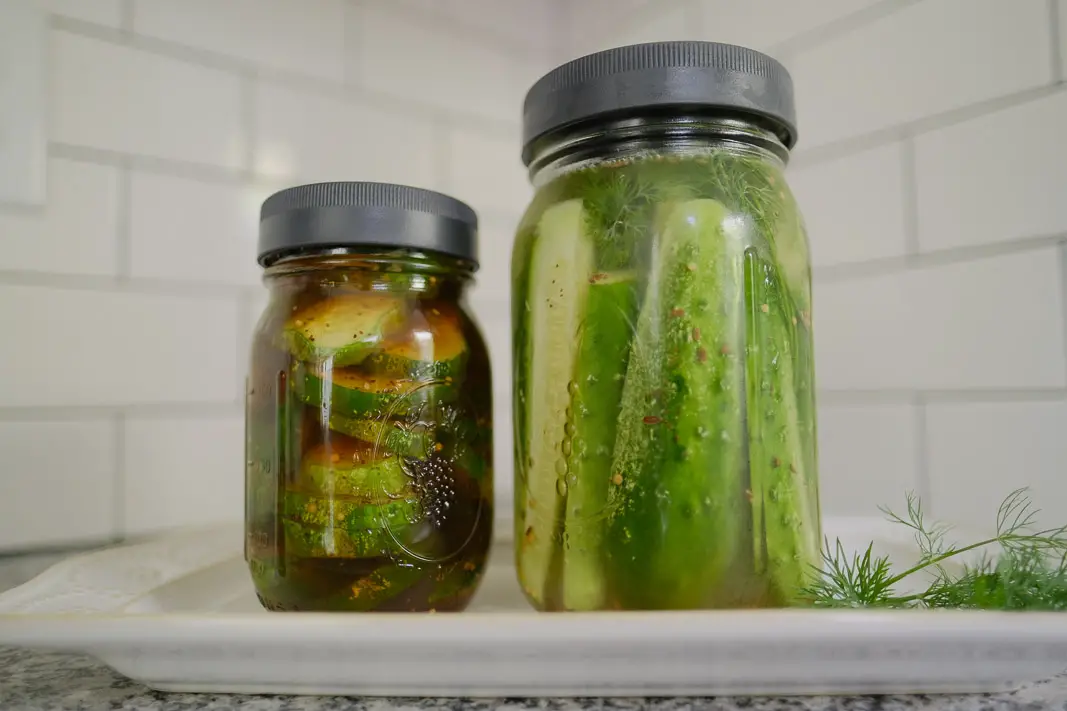
Refrigerator Pickles 2 Ways no-canning needed and I'm here to show you how to make them!Dill plus bread & butter, Quick, Easy & No-Canning Needed!I promise you it's the easiest thing since bread & butter! As a bonus, I'm including both bread & butter and dill pickles! Photography by: Erin S. of Simply Living NC I don't know about you, but there's just something about opening that refrigerator door to have a big ole' juicy jar of pickles looking back at you just waiting to be enjoyed on the back porch on a hot summer day! And if you live in the South, like I do....well you just might take a big ole' swig of that pickle juice right out of that cold mason jar! Now that's when you know you live in the South! What is a Pickle?Well, it's simply a small cucumber preserved in a brine solution of vinegar.Most pickles are varieties of cucumbers grown specifically for pickling.If you'd like to know how I go about Growing my Cucumbers for Pickling, Enjoy THIS BLOG. photography by: Erin S. of Simply Living NC Are Pickles Healthy or Good for You?Pickles are indeed a low in fat, low calorie snack which include other benefits.They can benefit by providing Vitamin K, Vitamin A, Potassium, Vitamin C, and Electrolytes That being said, they can be high in sodium therefore people with high blood pressure may want to limit their intake of pickles. How to Make Refrigerator Pickles 2 Ways both dill plus bread & butter... SUPPLIES YOU WILL NEED: A Jar with a Lid -I Love a Simple Quart Size Canning Jar Like These 1 QUART MASON JARS -Oh and THESE Plastic Screw on Lids are a Mason Jar Lover's Dream!!Offered in Regular Mouth or Wide Mouth Lid Sizes. They also offer these Colorful Similar Lids. About 5 Minutes of Your Time Ingredients Listed in the Recipe HOW TO PREPARE dill pickles: photography by: Erin S. of Simply Living NC Pick or Purchase Cucumbers, Wash, Slice into Wedges, Pack Full into 1 Quart Jar photography by: Erin S. of Simply Living NC photography by: Erin S. of Simply Living NC photography by: Erin S. of Simply Living NC Combine, White Vinegar, Kosher Salt, Dill Seed, Celery Seed, and Mustard Seed, Pour Over PicklesTop with Fresh Dill, Cover with Lid (THIS LID has Made me Love of Canning Jars even MORE!) photography by: Erin S. of Simply Living NC photography by: Erin S. of Simply Living NC Refrigerator Overnight Dill Quick Pickles Quick & Easy Overnight Pickles No-Canning Needed! 1 Quart Jar 3-4 Pickling Cucumbers ((home grown if possible))1 1/3 to 1/4 C Water ((depending on how packed full the jar is))4-5 tbsp White Vinegar ((subject to taste of how vinegary you prefer))1 tbsp Kosher Salt or Pickling Salt ((it's very important to use recommended salt))1/2 tsp Mustard Seed1/2 tsp Dill Seed1/4 tsp Celery Seed6 sprigs Fresh Dill ((I love growing my own)) Pick Home Grown Pickling Cucumbers or Gather them at
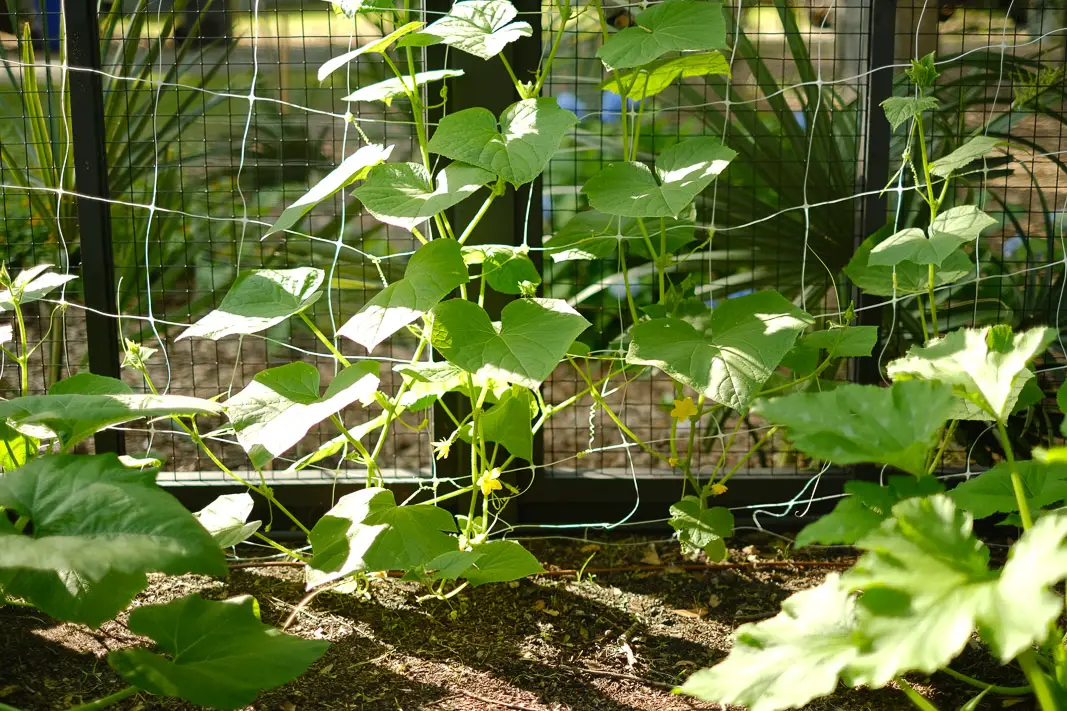
How to Grow Pickling Cucumbers on a Simple Trellis
Have you ever wondered how to Grow Pickling Cucumbers on a Simple Trellis in your Garden?Wouldn't you simply adore reaching in your refrigerator to grab a hand grown pickle!You're probably thinking it's too much work, too hard of a process to pickle my cucumbers.Well, I'm here to tell ya, it's not....it's actually quite easy to grow cucumbers for pickles. photography by: Erin S. of Simply Living NC HOW TO GROW PICKLING CUCUMBERS ON A LIGHTWEIGHT TRELLIS STEP 1: SELECT YOUR CUCUMBER SEEDSI prefer THESE SEEDS "National Pickling Cucumber" STEP 2: PREPARE YOUR TRELLISCucumbers love to climb! There are many types of trellises to choose from, however after much trial and error I have found THIS SIMPLE LIGHTWEIGHT SOFT TRELLIS is simply amazing! Seriously, I love it for my cucumbers, my peas, my squash and my beans! STEP 3: PLANT YOUR SEEDSDepending on your growing zone, you can choose to direct sew in the ground or you can start in a greenhouse. I'm in Zone 8b, therefor I alway direct sew my cucumbers. Plant in a sunny location. STEP 4: WAIT, LOVE, & CARE Now it's time to wait, love and care for your little ones.Within just a few days you'll most likely see the little seeds sprout, you'll want to water and feed your seedlings. We love using THIS FERTILIZER STEP 5: HARVESTOh my goodness, if you are like me you are jumping for joy from the vision of all these little cucs hanging upon their vines just waiting to be pickled! When your cucumbers reach the size of about 3 to 4 inches is when you'll want to harvest them for pickling. I have 2 favorite Harvesting Baskets, THIS ONE is my Small one, perfect for a Small Harvest and This LARGE one for my Larger Harvests.The reason I have found these baskets to be perfection is due to their multi-use. They provide me a way to set the basket on the ground while harvesting, rinse in my outdoor sink, and bring inside for a second rinse in my indoor sink. (see cute pic below with my fave basket & boots) STEP 6: PICKLE TIME!That's right, now it's time to pickle your Cucumbers!You may be wondering just how to go about turning those lovely cucumbers into crunchy pickles.Well, not to worry....I've got that taken care of for you in my BLOG: HOW TO MAKE REFRIGERATOR PICKLES TWO WAYS; dill and bread & butterIn this blog I provide step by step how to make Bread & Butter and Dill Pickles in an Easy Refrigerator No Canning Process photography by: Erin S. of Simply Living NC photography by: Erin S. of Simply Living NC IF INTERESTED, HERE ARE THE PRODUCTS MENTIONED IN THE BLOG
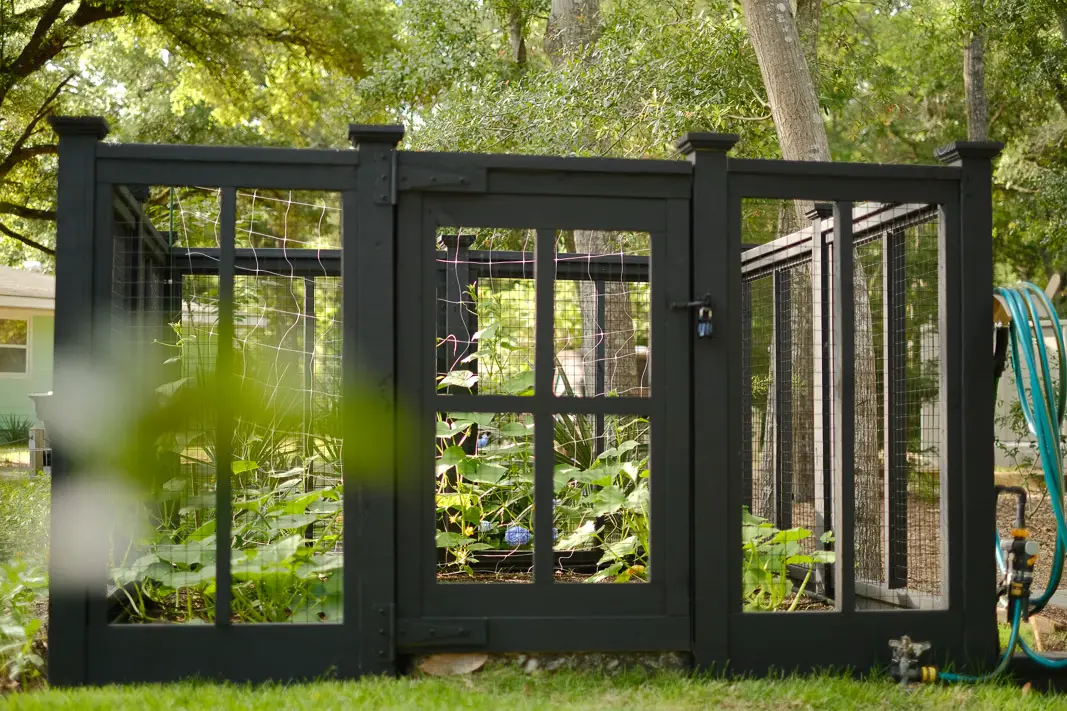
DIY Custom Vegetable Garden Fence; black cottage design
Custom Design & Photography by: Erin S. of Simply Living NC Let's talk about your DIY Custom Vegetable Garden Fence with our Black Cottage Design!Are you tired of deer and other animals getting into your garden and eating all off your veggies, yet you don't really care to put the drab deer fencing bought at the big box store? I'm here to help!I'm super excited to share our custom design with you! Adding a DIY Custom Vegetable Garden Fence to your home or cottage will provide you with a one of a kind custom feel with an elegant visual to flow within any landscape or homeowners yard. How to build this DIY Custom Vegetable Garden Fence; black cottage design SUPPLIES NEEDED:(we were able to order all supplies online & have them delivered to our front door!) -2"x4"x8' pressure treated lumber-2"x8"x8' pressure treated lumber-4"x4"x8' pressure treated lumber-2"x2"x8" pressure treated lumber for decorative divider in each panelBlack PVC Coated Welded Wire Mesh Size 1.5 in. x 1.5 in.-1"x2"x8' pressure treated trim boards for gate-High Quality Exterior Solid Stain TOOLS NEEDED: -Table Saw (we like this Delta Table Saw)-Miter Saw (we like this Kobalt Saw)-Sander (we like this Porter-Cable Sander)-Screw Gun (we like this Ryobi Driver) GREAT, LET'S GET STARTED ON YOUR DIY CUSTOM Vegetable Garden with our elegant black COTTAGE DESIGN! -PREP Prep will vary per person. With us personally, we are very limited with sunny areas in our landscape as we have so many beautiful Oak trees which we love living here in the South. Sadly, Hurricane Florence came through and wrecked havoc on some of them which caused some to die. That being said, this was one time when calling the tree removal service wasn't as bad as previous times. This tree removals meant we would be blessed with a sunny spot to build our new garden! The large trees were removed, the ground was raked and a pretty stump was left which we have decided to incorporate into an herb garden....more on that to come! Onward bound to designing this beautiful DIY Custom Vegetable Garden Fence with a black cottage design! -DESIGN We designed a template to refer to during the project.In addition we have kindly included this template of our design to guide you through your project.Our vision was to be: Elegant, Cottage, Craftsman Style with a Black Finish! Custom Design by: Erin S. of Simply Living NC -ASSEMBLY Setting posts: This project started just like building a fence with the posts. We first laid out our location with strings to make sure our post would go in to be square as well to make the correct size that we desired. Once we had our layout we proceeded to digging post holes for 4"x4" ground contact treated posts. We set our posts "dry" meaning we didn't use concrete, you could use concrete we just knew it would be strong enough in our ground once everything was tied together. Custom Design & Photography by: Erin S. of Simply Living NC Ground
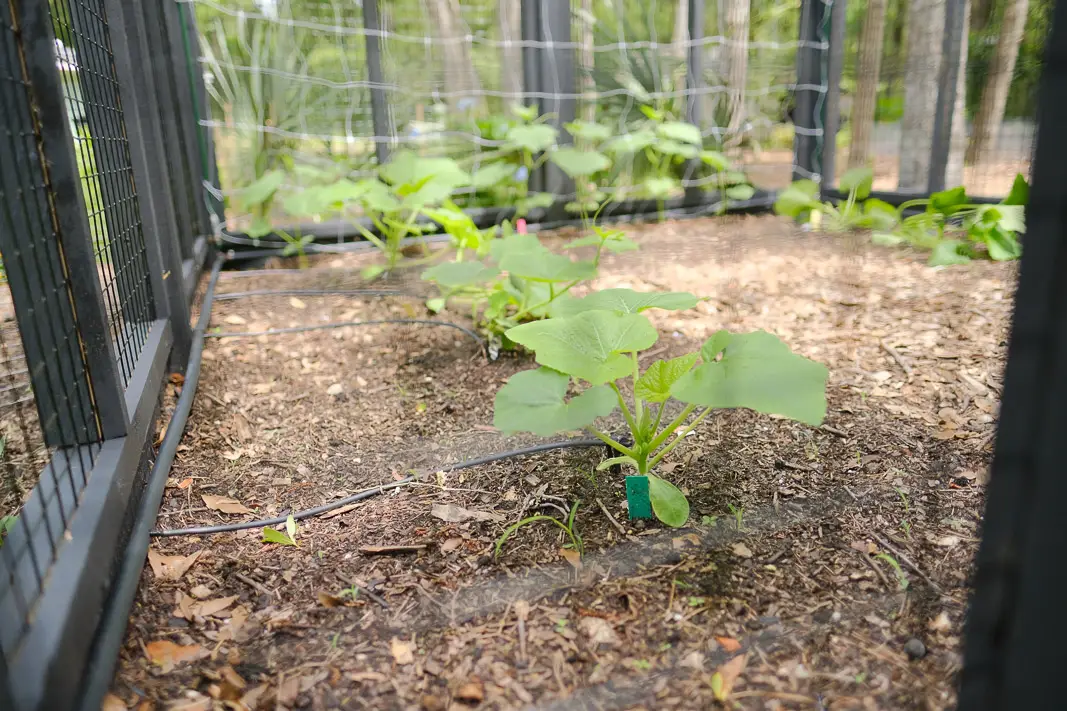
DIY Vegetable Garden Drip Irrigation; made easy
Are you tired of dragging out the hose to water? Not to worry, with our DIY Vegetable Garden Drip Irrigation it's a once tough process made easy! The importance of VEGETABLE garden drip irrigation The importance of drip irrigation for your vegetable garden depends a lot on what type of plants you are growing. Many vegetables do not like overhead watering and it can actually cause more disease, as well as it can also burn the leaves of your plants if watered within the heat of the day. Many times with overhead watering verses drip irrigation, it will also use more water instead of only putting water where it is needed. photography by: Simply Living NC photography by: Simply Living NC Companies nowadays have created drip irrigation to be super user friendly! A once chore of a project has now turned into a DIY Vegetable Garden Drip Irrigation project made easy! Not only is this an easy diy project, it will add up to be a cost savings of water which makes it very worthwhile to install a simple system like this DIY vegetable garden drip irrigation. list of parts needed: 1/2 Inch Universal Hose to Faucet Adapter Universal Barbed Elbow Fitting 1/2" Drip Tubing End Closure 1/2" Barbed Valve, Male x Male 1/2" Blank Distribution Tubing, 100 1/4" Barbed Coupling Fitting 1/4" Tubing, 6" Emitter Spacing Irrigation Support Stakes for 1/4-Inch Drip Tubing All-in-One Drip Irrigation Punch Tool Dripper Emitter 1/4" Tubing Black, 50' Coil how to get started: To get started first find your water supply preferably a faucet near your garden. From the garden hose faucet use the 1/2 inch hose to faucet adapter to attach the 1/2" tubing, this is what will supply the water to the garden and all your emitters. You will use this supply tubing as a way to get water to all spots of the garden, therefor you will want it close to plants, but not right up against them. We used 1/2" conduit clamps to screw the tubing to our DIY custom vegetable garden fence; so season after season it would be ready for us, yet be out of the way when getting soil ready and planting. If you'd like to Read our DIY CUSTOM VEGETABLE GARDEN FENCE; BLACK COTTAGE DESIGN BLOG CLICK HERE. Next step for the 1/4" tubing this will get the water to each plant using 1/4" barbed coupling is how you will transition from 1/2" to 1/4". Using the irrigation punch tool is how you will punch a small hole into the 1/2" tubing thereafter inserting the 1/4" barbed coupling then installing the 1/4" tubing. Lastly installing the emitter this can be of personal preference to what size emitter of how many gallons per minute. We also installed a shut off valve in our garden instead of depending only turn off the garden hose faucet this helps if this faucet also supplies other attachments another garden or perhaps an awesome outdoor sink....we simply adore our outdoor

Whiteflies on Your Garden Plants & Houseplants; how get rid of pests with my 5 Step Solution
Do you have Whiteflies on Your Garden Plants & Houseplants and wonder how to get rid of these pests?Don't despair, I'm here to help you get rid of these nasty white pests WITH MY 5 STEP SOLUTION! You're taking your daily stroll throughout your beloved houseplants while sipping on your warm beverage as you stroll throughout your gorgeous garden, only to spot a sticky clump of white throughout your plants! Ugh....your heart drops as you realize this clump of white is the dreaded Whiteflies! Whiteflies sucking the life and energy out of your plants before your eyes. Off you go...to start my 5 Step Solution.Before I share this Solution with you...let's talk a bit about these gross little white ones: WHAT ARE WHITEFLIES? Whiteflies are actually not flies at all, they are related to aphids and mealybugs called Hemipterans.They are teeny tiny insects that feed on the sap within your plants. They can be found throughout your outdoor garden, vegetable garden, fruit garden and houseplants. They like to gather in thick clusters typically on the underside of plant leaves or in the nooks and crannies of each plant. The Dreaded Whiteflies Photo by: Erin S. of Simply Living NC WILL WHITEFLIES DAMAGE MY PLANTS? Sadly the answer is YES! These dreaded ones will suck the life out of your plants.What I mean by that is the whiteflies will suck on the juices/sap within your plants which in return will cause them to be stunted, yellow, and the leaves and/or stems may even die. MY FIVE STEP SOLUTION TO GETTING RID OF WHITEFLIES: STEP 1: Spray off the whiteflies with either a high powered stream from your hose or you could even have fun doing it with one of these gadgets called Bug-A-Salt LOL STEP 2: Spray the entire plant with a mixture of Soapy Water. (I prefer Dr. Bronners) I add 1 tbsp. to one gallon of water. Make certain to spray the underneath of all leaves. STEP 3: The following day spray the entire plant with a mixture of soapy water & Neem Oil STEP 4: The next day spray the entire plant with This Garden Spray w/ Spinosad per directions STEP 5: Place These Yellow Sticky Traps Near the Infected Plant (I kid you not, THESE Yellow Ones are my Saving Grace when it comes to Flying Pests on my Plants) In fact I wrote an entire BLOG about getting rid of the dreaded Fungus Gnats After this 5 step process, continue to keep an eye on your infected plant and other plants within the area. If you see the white fluffs again, continue with the 5 step process. You will see they will gradually get better if not immediate. I had an infected Dogwood Tree & Rose and now they are totally gone and they are both thriving after the 5 Step Process! IF INTERESTED, HERE ARE THE PRODUCTS MENTIONED IN THE BLOG
Broccoli Leaves, How to Harvest, Steam & Eat; grow your own food
You may be wondering How to Harvest, Steam & Eat Broccoli Leaves and I'm gonna help you grow your own food in the garden! There's so much more to Broccoli than just the Crowns and Florets! photography by: Erin S. of Simply Living NC CAN I EAT BROCCOLI LEAVES? Yes Indeed... You Sure Can Eat Broccoli Leaves! In fact they are quite nutritious for you!NUTRIENTS IN BROCCOLI LEAVES:VITAMIN A: good for your vision, boosts your immunityVITAMIN C: boosts your immunity, wound healing, helps with absorption of ironFOLATE OR B9: helps with mental health, tiredness, fatigue, and immune systemRIBOFLAVIN OR B2: boosts energy, benefits vision, and improves tiredness and fatigue PHOSPHORUS: benefits bones and teethPANTOTHENIC ACID OR B5: improves energy, mental health, tiredness and fatigueCALCIUM: good for bones HOW TO HARVEST BROCCOLI LEAVES: HARVEST LEAVES WHEN THE CROWN IS IN BUD FORM, TUCKED DEEP WITHIN THE LEAVES(a little confession, I have harvested a couple leaves before the crown is formed) HARVEST THE OUTTER LEAVES WHICH ARE ABOUT 6 INCHES IN LENGTH YOU CAN CONTINUE TO HARVEST THE LEAVES, AS THEY ARE CUT & COME AGAIN(harvesting will actually help promote growth on the broccoli plant) TYPICALLY ONCE THE CROWN IS IN HARVEST SIZE, YOU'LL WANT TO STOP HARVESTING THE LEAVES AS THEY WILL START TO PRODUCE A BITTER BITE TO THEIR ONCE TENDER TASTE. WHAT DO BROCCOLI LEAVES TASTE LIKE: Broccoli Leaves Taste a Bit Like Broccoli, a Bit Like Collards, a Bit Like Kale photography by: Erin S. of Simply Living NC HOW TO STEAM BROCCOLI LEAVES: WASH LEAVES THOROUGHLY (this step is very important because little nasties can be hiding within the leaves. I prefer to wash with my fave lil' colander and then soak within my salad spinner and drain) CHOP OR SLICE LEAVES STEAM(this is one of the easiest methods of cooking, I simply ADORE THIS STEAMER takes about 10min) photography by: Erin S. of Simply Living NC photography by: Erin S. of Simply Living NC photography by: Erin S. of Simply Living NC photography by: Erin S. of Simply Living NC WHAT TO EAT ALONGSIDE BROCCOLI LEAVES: This of course is a personal preference, however my fave choice of side is simply Rice & Black Beans!I mean seriously, why wouldn't you want this much nutrition in one bowl?Yet another huge benefit of my FAVE Rice Cooker which is also my Steamer!This Steamer/Rice Cooker has changed my life, in fact I have the Larger Size on it's way!It makes cooking my favorite foods like Veggies, Rice, Quinoa, & Oatmeal so EASY...I LOVE it So Much!The black beans, I prepare prior to cooking my rice in the rice cooker, then I layer the black beans on top of the cooked rice at the end of the cooking cycle simple to warm up the beans.Season with a little Pink Himalayan Salt (yet again more nutritious values) photography by: Erin S. of Simply Living NC So there ya have it friends....a bowl of nutrients part of which you grown all
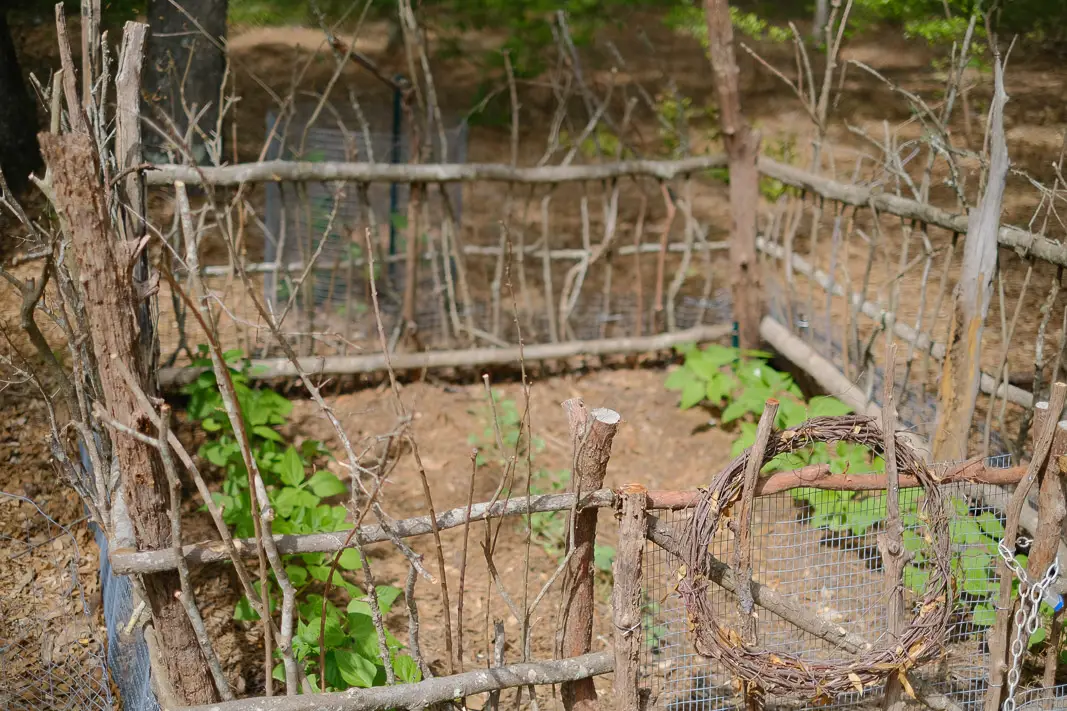
VICTORY GARDENS WITH FORAGED ITEMS WHILE QUARANTINED
During the Covid-19 Quarantine, NOW is the time to Grow Your Own Food; protect it with a Twig Garden Fence built with Foraged Items....grow that victory garden! photography by Erin S. of Simply Living NC Victory Gardens with foraged items while quarantined is a simple way to supplement your food supply.Stuck at home during this Covid-19 Quarantine, yet you long to have the Garden of your Dreams?We created our Twig Garden Fence, by Creating a Garden with Foraged Items found on your own property! The perfect way to go during this time of uncertainty within our lives. WHAT IS A VICTORY GARDEN? Back in the World War II times families planted Victory Gardens to help prevent food shortage. Small yards, big yards, balconies, window boxes, were all planted to aid in this food shortage relief.Today we may not be in war times, however we are in a bit of saddened and scary time where a food shortage could indeed happen. I'm not saying it will, but I'm saying why chance it? Get those Gardens Growing. Grow wherever you can with whatever you can! For us foraging is not a new concept, as many may remember we created this rustic garden.One garden was plenty for us in the past two years, however now during this scary stay at home quarantine time that comes alongside the Covid-19 situation, one is just not enough!Now is the time to Grow Your Own Food! We face the possibility of food shortage, not being able to go to the grocery stores, and life living on dry spaghetti and pasta. This outcome leads to lessened nutrition for our bodies, mind, and soul. Speaking of Soul, Gardening is Good for the Soul! That's right, gardening not only nourishes our body with the crops we grow, it also provides us much escape for our mind, body and soul. With orders of "stay at home" we aren't able to go out and I don't know about you, but we aren't ones to just sit inside and play video games. We love connecting with nature. There's something very spiritual about connecting with the land. As professional beach portrait photographers, we of course have had to cancel all of our jobs as our beaches are closed and vacation rentals not accepting visitors. This being said, we don't have much money at all to spare. How would we ever create a protective deer proof garden without money for strong fencing and posts? The answer was simple, we would forage our own supplies.We have a woodland type area on our property with many trees, we found dead fallen branches to create this protective twig garden fence. First we planted the posts and one by one we intertwined the twigs. PREPARE THE SITE GATHER FALLEN WOOD SCREW MAIN SUPPORTS TRIM ALL SMALL BRANCHES WEAVE THE TWIGS photography by: Erin S. of Simply Living NC Online Purchase of Inexpensive Garden Supplies: Finalization of the structure quickly made us realize we would need a few additional